
Rohin Malhotra
Perfect rice is simple to describe: grains that cook through evenly, stay separate, and fluff up instead of clumping. Getting there is less luck than it feels like in the moment; it is just rice, water, heat, and time doing what they do. Still, if you have ever hovered over a pot wondering whether you are about to uncover a sticky slab, a scorched ring at the bottom, or rice that is somehow crunchy and soggy at once, you already know this can feel oddly personal.
Cooking rice well is not about memorizing one sacred ratio. It is about learning a few small rules that travel with you from basmati for dal-chawal to jasmine for a Thai curry to jeera rice perfumed with cumin and ghee. Roughly half the world's population depends on rice as a staple food, so if this has ever tripped you up, you are far from alone. The usual sticking points (how much water, why it turns mushy, why it stays hard) all come back to the same handful of causes, and they are all fixable. We will walk through the steps in the same order you will do them at the stove.
The same rules apply whether you cook rice by hand or let Posha handle the timing, heat, and cooking stages for you. The difference is that Posha uses built-in intelligence to watch what is happening in the pan, adjust heat, and move through the recipe without constant stovetop babysitting.
The Three Pillars of Perfect Rice: Grain, Water, and Heat
Before you scoop a cup of anything, it helps to name the three dials you are actually turning. Get these right and rice becomes boringly reliable; nudge one, and the others have to move with it.

Grain, water, and heat are interdependent — adjust one and the others must follow.
Grain. Every kernel carries two starches: amylose and amylopectin. Amylose is what keeps grains defined; amylopectin is what makes them cling. Long-grain rice like basmati tends to be higher in amylose, which is why it cooks up light and separate. Short-grain rice tilts toward amylopectin, which is exactly what you want for sushi rice. Once you know which direction your rice leans, the rest of the decisions get easier.
Water. "How much water for rice?" is the question that shows up in every kitchen sooner or later. The honest answer depends on the rice itself, the pot (a wide pot loses more to evaporation), and how well your lid seals. We will get specific ratios in a minute, but the basic idea is steady: rice needs to absorb a set amount of water, and whatever is left has to leave as steam. Too much water and the grains swell and slump. Too little and the centers stay firm.
Heat. This is where stovetop rice usually goes sideways. The most delicate moment is the shift from a real boil to the quietest simmer you can manage. Keep the heat too high and you will scorch the bottom. Drop it too far and the pot never really steams; the rice just sits in hot water. Good rice is mostly about making that transition cleanly, then keeping your hands off the lid.
How to Cook Rice: The Stovetop Method, Demystified
The stovetop is where the logic of rice cooking clicks. Once you see what each step is doing, you can make it work with different grains, different pots, and the stove you actually have. The whole thing comes down to three stages.
Step 1: The Prep That Prevents Stickiness
Rinse your rice. This is the part people skip, and it is usually the part they regret. That cloudy water you pour off is loose surface starch from the milling process, and it is exactly what can turn a pot of rice into one big clump. Rinsing rice before cooking clears away that extra starch, which helps the grains cook up fluffy and separate. Use cold water, swirl gently, drain, and repeat until the water is mostly clear, usually three or four rounds.
With long-grain rice like basmati, a 20 to 30 minute soak after rinsing is a quiet little upgrade. It gives the grains a head start on hydrating, so they cook more evenly and are less likely to split or go soft at the edges while the centers catch up. You also get that longer, more graceful basmati shape. For the full breakdown on soaking times, toasting in ghee, and coaxing out basmati's signature fragrance, our dedicated guide on how to cook basmati rice covers it all.
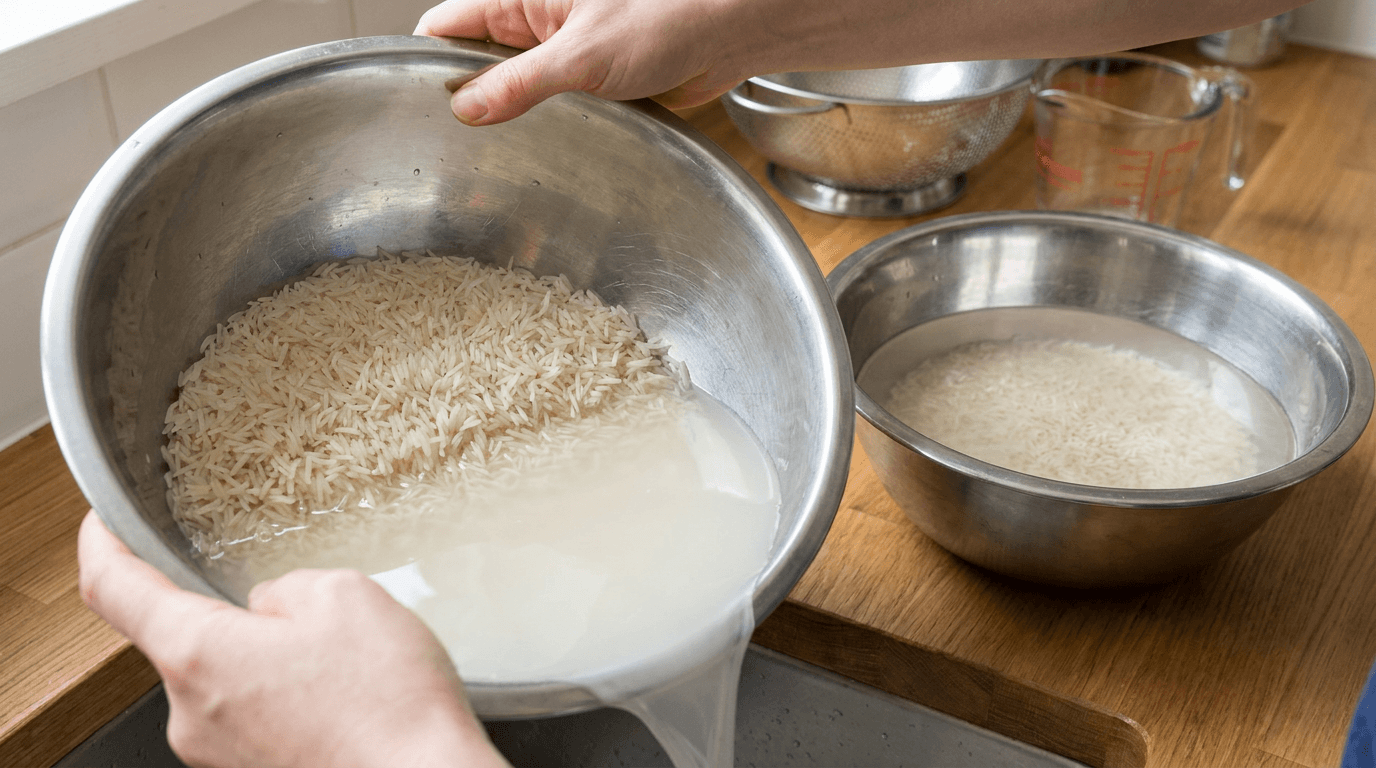
Three to four rinses removes surface starch — watch the water go from cloudy to clear.
Step 2: Nailing the Rice to Water Ratio
You have probably heard the "knuckle method": fingertip on the rice, water up to the first knuckle. It can work once you have matched it to your pot and your hand, but if you want repeatable results, measure. A common starting ratio for long-grain white rice is 1 cup of rice to 1.5 cups of water. Use the chart below as a baseline, then tweak based on your pot and lid.
Rice Water Ratio Cheat Sheet
Rice Type | Rice Amount | Water Amount | Stovetop Simmer Time | Expected Result |
|---|---|---|---|---|
Basmati | 1 cup | 1.5 cups | 12 to 15 min | Light, separate grains |
Jasmine | 1 cup | 1 to 1.25 cups | 12 to 15 min | Fragrant, a little cling |
Long-Grain White | 1 cup | 1.5 to 1.75 cups | 15 to 18 min | Tender and distinct |
Jeera Rice (Basmati base) | 1 cup | 1.5 cups | 12 to 15 min | Fluffy with toasted cumin |
Scaling tip: When you make a bigger batch of rice, don't just double the water. The amount of water that turns to steam (evaporation) stays about the same, but the amount the rice needs to soak up (absorption) increases. Doubling the water for double the rice leads to a soggy outcome. A better approach is to use a 1:1 ratio of rice to water, then add a fixed amount for evaporation (about a half cup) regardless of the batch size. This method accounts for both absorption and evaporation separately.
Making jeera rice or ghee rice changes the flavor, not the math. Toast the cumin seeds (or other whole spices) in ghee, then add the rinsed rice and water. Keep the same ratio you would use for plain basmati; the fat lightly coats the grains and helps them stay separate. Jasmine rice is its own thing: it is naturally more clingy, so it generally needs less water than basmati. Start at 1:1, then add a tablespoon or two more next time if you want it softer.
Step 3: The Heat, the Steam, and the Final Rest
Put your rinsed rice and measured water in a heavy-bottomed pot. Bring it to a full rolling boil with the lid off; you want active bubbling across the surface, not a few sleepy blips at the edges. Then turn the heat down in one clean move to the lowest setting your burner can hold, and seal the pot with a tight-fitting lid.
Then do the one thing that feels hardest: leave it alone. Lifting the lid lets steam escape, and steam is the engine here. With the lid on, the pot becomes a small, steady steam chamber that cooks the rice evenly. Most long-grain varieties take about 12 to 18 minutes at a gentle simmer, depending on the type (see the table above).
When the timer ends, turn off the heat and keep the lid on for another 10 minutes. This rest is where rice goes from "fine" to fluffy. The leftover steam finishes any slightly firm grains, and the moisture settles back through the pot so the bottom is not wet while the top dries out. After the rest, fluff with a fork from the bottom up. You should end up with tender, separate grains that are ready for anything from a simple tadka dal to an elaborate biryani.

Three stages, one rule: keep the lid on and let the steam do its work.
Troubleshooting: Why Is My Rice Mushy (or Crunchy)?
When rice misbehaves, it is almost always one of the three pillars showing up to collect its dues. Use this as a quick read on what went wrong.
Mushy or sticky rice usually comes from one of three places: too much water, rice that was not rinsed enough, or heat that never quite held a real simmer (so the rice kind of stewed instead of steaming). As the rice cooks, amylopectin is the starch that leaks out and binds grains together (The Times of India, 2026). Your easiest fixes are also the most boring: rinse thoroughly, then measure your water instead of eyeballing it.
Crunchy or undercooked grains point the other direction: too little water, not enough time, or a lid that leaks steam. If the outside tastes cooked but the centers stay hard, the pot often needed a longer covered rest after the heat was turned off.
A burnt, crusty bottom is a simmer that ran too hot. During the covered phase, you are aiming for gentle steam, not vigorous bubbling. If your stove cannot hold a low enough flame, a heat diffuser (a flat metal disc between burner and pot) usually fixes it for a few dollars.

Mushy, perfect, and undercooked — rice texture reveals exactly where water or heat went wrong.
How Posha Helps You Cook Rice More Consistently
Once the science makes sense, what is left is the part nobody writes down: doing it correctly when the rest of dinner is also happening. A Tuesday night is not a cooking demo. Someone needs help with homework. Palak paneer is bubbling away. You lift the lid "just for a second." The simmer creeps up because the dial got bumped while you reached for the cumin. The rest gets skipped because everyone is already hungry.
That is the gap the Posha cooking system is meant to close. You add rinsed basmati and water, then step away. Posha brings the pot to a controlled boil, eases it down to a true low simmer, and manages the timing without you babysitting the burner. It tracks when the water has been absorbed and detects when boiling starches like rice have absorbed or lost free water until you are ready to serve. Less peeking, fewer scorched-bottom surprises, and far less second-guessing.
While it does that, you can be at the other burner blooming mustard seeds in hot oil for a tadka, stirring a pot of dal, or simply taking five minutes back. When rice is the foundation of the meal, it matters that your jeera rice or ghee rice lands the same way every time: fluffy, separate, and right where you want it.

Posha cooks the rice while you focus on the tadka, dal, or the rest of dinner
Common Misconceptions About Cooking Rice
"The ratio is always 1:2." This one refuses to die. A 1:2 ratio makes sense for brown rice, which still has its bran layer and needs more water and a longer cook. For white rice, especially long-grain varieties, 1:2 is usually a fast track to soggy grains. Start around 1:1.5 for basmati and adjust from there.
"You should stir rice while it cooks." Stirring breaks grains and shakes loose more starch, which pushes you toward gumminess. Unless you are making risotto (where that creamy texture is the whole point), keep the spoon out once the lid goes on. Let steam do its job.
"Rinsing does not really matter." It matters a lot. Rinsed rice and unrinsed rice do not behave the same in the pot: one gives you distinct grains, the other leans toward starchy paste. Three quick rinses take under two minutes and change the texture more than any fancy trick.
Key Takeaways for Perfect Rice
Rinse rice three to four times to wash away surface starch and keep grains from clumping.
Start with a measured ratio: 1:1.5 for basmati, 1:1 to 1:1.25 for jasmine, and 1:1.5 to 1:1.75 for long-grain white rice.
Bring the pot to a full boil, then drop immediately to the lowest simmer and cover tightly. Do not lift the lid while it cooks.
After the simmer time, rest the rice off the heat for 10 minutes with the lid still on. That rest is where fluffiness happens.
When you scale up, do not double the water just because you doubled the rice. Evaporation does not scale the same way.
For consistent weeknight rice without hovering, the Posha cooking system handles the heat and steam so you can focus on the rest of dinner.

Five rules for perfect rice — rinse, measure, simmer, resist peeking, and rest.
Frequently Asked Questions
What rice water ratio gives you fluffy rice?
For most long-grain white rice, a solid starting point is 1 cup of rice to 1.5 cups of water. Basmati is typically the same (assuming it is rinsed and soaked). Jasmine rice is naturally a bit clingier, so it usually does better closer to 1:1 or 1:1.25. Measure first, then adjust slightly for a wide pot (more evaporation) or a loose lid (more steam loss).
How should I cook basmati rice vs. jasmine rice?
Basmati does well with a 20 to 30 minute soak before cooking, which helps the grains hydrate evenly and elongate. Use about a 1:1.5 water ratio for separate, fluffy grains. Jasmine does not need soaking, uses less water (about 1:1 to 1:1.25), and comes out fragrant with a little natural stickiness. For basmati-specific details, including ghee rice and jeera rice variations, see our basmati rice guide.
Can I use this same method for brown rice?
Yes, the structure is the same (rinse, boil, simmer, rest), but brown rice needs more water and more time because the bran layer is still intact. Plan on roughly a 1:2 ratio and a 40 to 50 minute cook. Keep the lid on for at least 10 minutes after the heat is off so the center finishes tenderizing.
Do I actually need to rinse rice before cooking?
Yes. Rinsing removes loose surface starch (amylopectin), which is what makes grains glue themselves together. It is quick and it has an outsized payoff: swirl the rice in cold water, drain, and repeat until the water looks mostly clear.
Why is my rice mushy on the bottom but fine on top?
That usually means the simmer was too hot. The bottom layer takes the brunt of the heat and overcooks while the top steams normally. Once the lid goes on, turn the burner down as low as it will go. If your stove still runs hot, a heat diffuser between the burner and the pot helps. Also double-check your water amount; extra water tends to pool at the bottom.
